well not quite johnny 5, but R2D2 has finally been finished, with yoda close behind (only his face to finish). It was quite interesting working on a non-biological sculpt. the most basic difference it the fact their is no faces or hands to sculpt, no cloth folds, and the fact that their is a lot of square parts.
what i have learned most from doing 'artoo' is making a basic shape and then covering it, basically adding flesh to a big skeleton, which is much easier than trying to create a perfect smooth shape in one go.
I have also started on my own version of the old marauder chaos dwarf mage. i do like the one thats available, but quite honestly the price is out of my range.
I have also this week finally done some work on my current chaos dwarf warhammer army, namely painting my blunderbuss standard bearer so i can enter him in chaos dwarf online's golden hat 5. It is a regular painting competition that i havent had a chance to enter before. Im not holding my breath but third place would be nice. My painting isnt good enough for first or second but my conversion is top notch. I even painted the rest of the front rank while i was on!
And not only that! i have painted most of the outside of my gorkamorka trakk! it has taken 6 hours of painting so far and is possibly just over half done. I am hoping to get a large proportion of it done tomorrow as well, as im working on saturday and sunday, and going to my fiancé's house tuesday till saturday, so next week will be a slow week miniatures wise.
Thursday, 27 March 2008
Tuesday, 25 March 2008
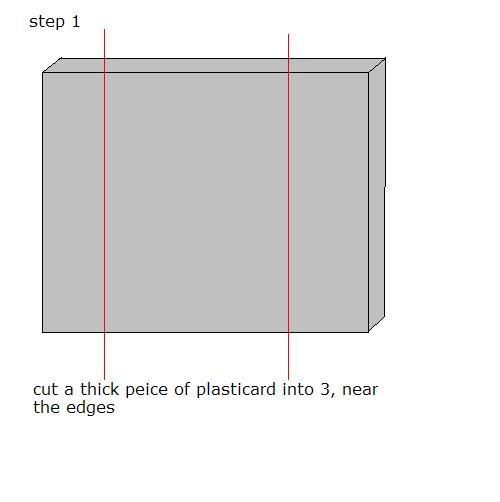
Fantasy Dungeon Door
This is a quick and easy guide for making fantasy dungeon doors from plasticard (althogh other materials may suffice)
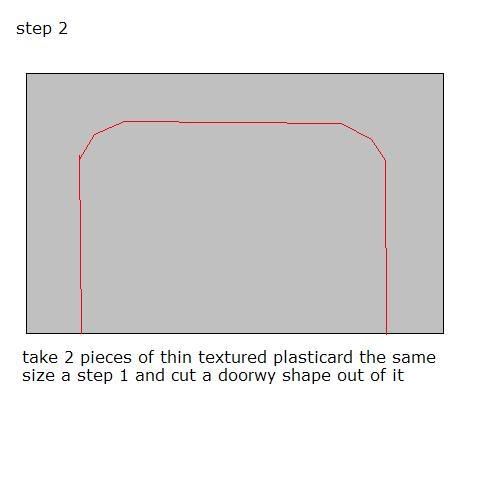
I suggest using pre textured card for the front and backs of the doorways, but for the actual door if you want to detail it you have to remember it has to fit into the slot.
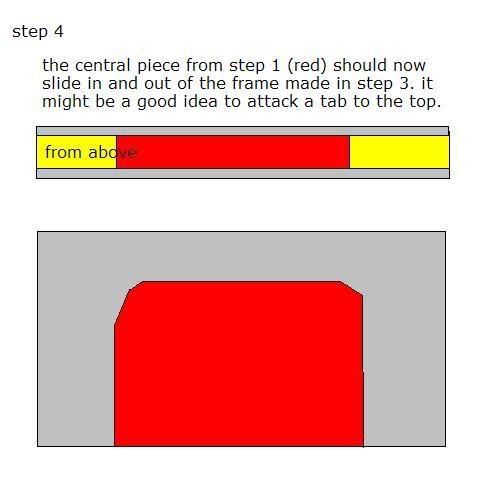
I have yet to make any doors like this myself but as soon as i do i shall post a picture on here to show better how it is done.
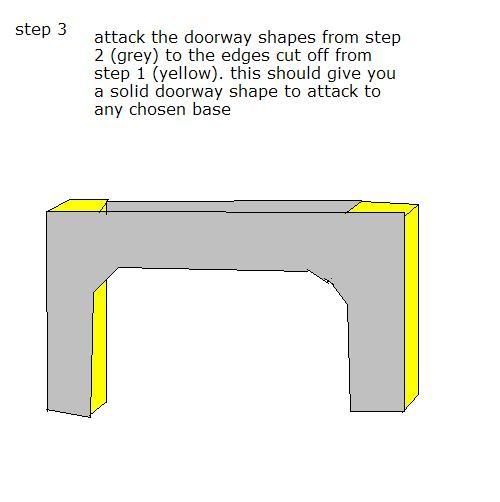
P.S. step 3 should say attach not attack.


 To all of you who are stuck making doors i hope this helps!
I suggest using pre textured card for the front and backs of the doorways, but for the actual door if you want to detail it you have to remember it has to fit into the slot.
I have yet to make any doors like this myself but as soon as i do i shall post a picture on here to show better how it is done.
P.S. step 3 should say attach not attack.
 To all of you who are stuck making doors i hope this helps!
Friday, 21 March 2008
star wars crazy
having had a couple of hectic working days this week my sculpting has suffered somewhat. All i have managed to do is get a couple of stages ahead on yoda and R2D2. And the reason for this? because i am enjoying sculpting those two so much more than the dollies and the faces and all the other uncharacteristic stuff im doing.
Which has led me to believe im going star wars crazy, trying to research what things im going to do next!
My plans initially include a Talz Jedi (big four eyed furry thing) because of a character i want to play in an upcoming star wars roleplay game. I have decided to make him naked, like muftak from the movies, rather than clothed in jedi robes like foul moudama from the clone wars cartoon. I dont think they would look very good over his bulky frame in 3d.
Other than that i plan on doing a few stormtroopers, and jawas and tusken raiders. I figured it would be easier to work through one setting rather than just pick random things from all over the star wars universe.
I also have the scenery to make, including small crates and other pieces of cover, to be made in 1 part resin molds.
And last but not least, as something of a sideproject in relation to the stormtroopers, a femtrooper. If you dont know what i mean you should google it! Its a nice surprise.
Monday, 17 March 2008
fantastic miniatures!
ok, so i made the title because i am liking the word fantastic lately, not sure why.
so my progress in the last 2 days, let me see. I have done more work on my musculature dollies and faces. progress is coming slowly but i am starting to see that it will take time and a lot more practice to get perfect with them. Even though ive been sculpting on and off for years now (more than a decade including conversions with greenstuff) i am learning new tips and tricks all the time.
i have also made a lot of progress on my sci fi minis im sculpting, and i will let you all into a secret of what they are, but not yet. i will give a hint. they are from stars wars and both short. And i am really really enjoying making them.
I have decided i like to create characters i am a fan of. I took my rein chin li, fixed it up a bit with procreate and glued it onto one of my resin bases, and then painted it in the classic color style. It felt very gratifying to know that everything on that mini was created entirely by me, even though it is a long way from perfect.
I have also painted a couple of my hasslefree models today, as they were sitting there semi completed on my desk looking very much in need of paint! If you havent guessed like most hobbyists i have a very long to do list, which includes
And last but not least i should hopefully soon get myself some more base blanks to start sculpting some more resin base 'greens'. I also hope to get some sci fi furniture/scenery underway soon as well.
so my progress in the last 2 days, let me see. I have done more work on my musculature dollies and faces. progress is coming slowly but i am starting to see that it will take time and a lot more practice to get perfect with them. Even though ive been sculpting on and off for years now (more than a decade including conversions with greenstuff) i am learning new tips and tricks all the time.
i have also made a lot of progress on my sci fi minis im sculpting, and i will let you all into a secret of what they are, but not yet. i will give a hint. they are from stars wars and both short. And i am really really enjoying making them.
I have decided i like to create characters i am a fan of. I took my rein chin li, fixed it up a bit with procreate and glued it onto one of my resin bases, and then painted it in the classic color style. It felt very gratifying to know that everything on that mini was created entirely by me, even though it is a long way from perfect.
I have also painted a couple of my hasslefree models today, as they were sitting there semi completed on my desk looking very much in need of paint! If you havent guessed like most hobbyists i have a very long to do list, which includes
- painting a ral partha dragon
- painting a space ork sturmtiger
- converting space orks into germanesque stormtrooper space orks
- painting chaos dwarfs blunderbussiers and black orcs
- converting chaos dwarf hobgoblin units
- gluing and paining heresy b'hakoth the destroyer
- painting heresy vampire
- painting new warhammer vampire counts skeletons
- painting rare chaos dwarf earthshaker cannon and crew
- basing all my heresy and hasslefree stuff
And last but not least i should hopefully soon get myself some more base blanks to start sculpting some more resin base 'greens'. I also hope to get some sci fi furniture/scenery underway soon as well.
Saturday, 15 March 2008
very interesting
well today i learned a couple of things about 2 part molds.
1 - they are a lot harder to make than 1 part molds
2 - dont forget mold release
3 - resin is very sticky
my theory for the mold worked perfectly. the little lego box was fantastic to pour the rubber into. unfortunately the modeling clay i decided to use was cheap kids plasticine which was way too sticky, and had to be extensively cleaned from the first mold half.
then when i poured the second mold half used the wrong mold release agent (i used the rubber vs resin agent rather than rubber vs rubber) and ended up with one solid lump with a 4 year ld sculpt of chun li stuck in the middle. this had to be sliced apart, which didnt go to badly but was not a perfectly clean cut due to the solid mass between her legs.
pouring the resin then proved difficult, as i didnt think beforehand about pouring from a cup into a tiny hold. fortunately i managed to overcome this by cutting a triangle in the edge of the cup to make a good pouring bit.
I think i also added too much pigment to the resin, which is making it very sticky. also there were noticeable gaps in the finished product where air bubbles had gotten too, or the mold had become damaged. It is also full of tiny particles of sticky resin which has now made it pretty much unusable unless i can clean it.
next time i am going to just try and copy a bought miniature which i know will mold fine in one piece, although its not really my own work i wll have something to compare the finished product with.
on the plus side my sculpting went well today, doing an even better human musculature, and adding quite good hands and face to the one i did yesterday. the thumbs i am particularly impressed with, although the face still needs a lot of work.
i have also started bulking out my 2 sci fi minis, although i not going to say what they are yet!
Friday, 14 March 2008
Introduction
Ok, so everyone seems to have a blog other than me, so i've decided to start one. It might not be as interesting as everyone else's because the subject matter is going to be very limited. Basically, my miniatures.
A bit about me. I have been sculpting since spring 2004, which is four years now. I that time i have made a few commission sales of scenery pieces, but never a figure. My goal over the next 6-9 months is to increase my ability to have one of my own figures mass produced and available for sale within the industry. If i can establish tomb miniatures as its own business that would be ideal, but working for others would still be a great achievement for me.
Now today is a great day in my miniature life, because i have just created my first 3 resin bases, and sculpted a much better human male armature, which is a lot more realistically proportioned than my usual sculpting.
The resin bases were made in a 1 part RTV silicone rubber mold, then filled with resin, which has a white pigment in it. This took less than 24 hours including drying time, and for my first go i find it was highly successful.
things ive learned
The resin on the other hand was really easy to work with.
Hopefully within the next 3 months i will have a range of resin bases for sale from my own website, which incidentally i am yet to create!
For the sculpting i used procreate, which is a lot like green stuff, but is in fact grey, and has a texture i much prefer. I use clayshapers over a wire frame which i glue together with cyano-acrilate 2 part super glue. Most of this stuff can be bought from heresy miniatures.
My plan is to try and create 1 armature of a human male every day i am at home and have spare time, and that way in a couple of months time my basic anatomy should be very up to scratch.
Another thing i am working on is faces. What i have done is stuck pieces of wire into corks, and put head shaped blobs of putty on the end. when these are dry i use them as bases for sculpting practice faces onto. This method means i can sculpt a lot at once. A lot quicker way of practicing than doing one face per figure.
I also have armatures set up for a certain sci fi droid and little green master that i intend to try and make, although this i just for my own fun.
A bit about me. I have been sculpting since spring 2004, which is four years now. I that time i have made a few commission sales of scenery pieces, but never a figure. My goal over the next 6-9 months is to increase my ability to have one of my own figures mass produced and available for sale within the industry. If i can establish tomb miniatures as its own business that would be ideal, but working for others would still be a great achievement for me.
Now today is a great day in my miniature life, because i have just created my first 3 resin bases, and sculpted a much better human male armature, which is a lot more realistically proportioned than my usual sculpting.
The resin bases were made in a 1 part RTV silicone rubber mold, then filled with resin, which has a white pigment in it. This took less than 24 hours including drying time, and for my first go i find it was highly successful.
things ive learned
- rubber gets everywhere
- rubber is hard to clean off of things
- rubber takes ages to dry out
- rubber stains
The resin on the other hand was really easy to work with.
Hopefully within the next 3 months i will have a range of resin bases for sale from my own website, which incidentally i am yet to create!
For the sculpting i used procreate, which is a lot like green stuff, but is in fact grey, and has a texture i much prefer. I use clayshapers over a wire frame which i glue together with cyano-acrilate 2 part super glue. Most of this stuff can be bought from heresy miniatures.
My plan is to try and create 1 armature of a human male every day i am at home and have spare time, and that way in a couple of months time my basic anatomy should be very up to scratch.
Another thing i am working on is faces. What i have done is stuck pieces of wire into corks, and put head shaped blobs of putty on the end. when these are dry i use them as bases for sculpting practice faces onto. This method means i can sculpt a lot at once. A lot quicker way of practicing than doing one face per figure.
I also have armatures set up for a certain sci fi droid and little green master that i intend to try and make, although this i just for my own fun.
Subscribe to:
Comments (Atom)